Background
The Fennec team, building Firefox for Android, is using Switchboard from KeepSafe, which is an open source project that targets Mobile app feature switching and A/B testing.
For the Fennec team, the update of experiments data is a bit cumbersome, the data is stored on a github repository and the switchboard server needs to be updated and reloaded with newer data on every change.
They eventually saw the kinto-admin for another project and, because the swichboard logic can be done on client-side, they decided to try to switch from Switchboard to Kinto to handle the experiments data.
It is a work in progress in the Fennec code base but we have decided to explore how we could use a similar approach to use Kinto to A/B test the web.
Introduction
I am not a big fan of A/B testing because I think, most of the time, we can do better however in certain circumstances A/B testing is still a really good idea to test a feature.
In an other hand, I am a big fan of the philosophy behind Kinto which as you may know is a database for the web.
In this article, I will take you through a little experiment I did lately to extend the work that has been done to activate a feature for some users in Firefox for Android.
How does A/B testing works?
You just created a really nice feature and you want to test multiple UX solutions in order to decide which one is most usable for your users.
For instance, what is the best wording for the French banner?
You can use A/B testing to test different variations on your user base and select the best option.
There are two technical parts on this:
- You need to display a different version of your banner to your users, probably with the same code.
- You need to be able to get the conversion rate for each solution to be able to compare them.
A word about the repartition algorithm
The reason why we can use Kinto for this, is that we can run the bucket repartition algorithm on client side.
Because it is easier to think in terms of percentages, we chose to split users in 100 buckets with a bucket ID from 0 to 99.
We then need a way to get a bucket ID for our user device with a homogeneous distribution on the bucket space.
One way to do that is to generate a random UUID and to store it on the device. But storing that value can be a bit cumbersome.
To make this user bucket stateless, on mobile we can use the device ID and on the web we can use the fingerprint.js project that aims to generate a unique user id from the browser configuration.
We can then use the modulo function to calculate the user bucket ID from this device ID.
const fingerprint = {deviceID: "1433179b5711413ba3c404075a629376"};
const deviceID = parseInt(fingerprint.deviceID, 16);
const userBucket = deviceID % 100;
// userBucket = 68
With fingerprint.js specifically, it looks like that:
new Fingerprint2().get(function(deviceIDString) {

  // Convert the device ID hex string into an integer
  const deviceID = parseInt(deviceIDString, 16);

  // Use a modulo on the device ID value to calculate the user bucket
  const userBucket = deviceID % 100;

});
How to use Kinto to know in which test your user is?
Apart from being a web service whose API is based on the simple and universal JSON format, one of the benefits of using Kinto is that you will be able to use the kinto-admin to configure your experiments.
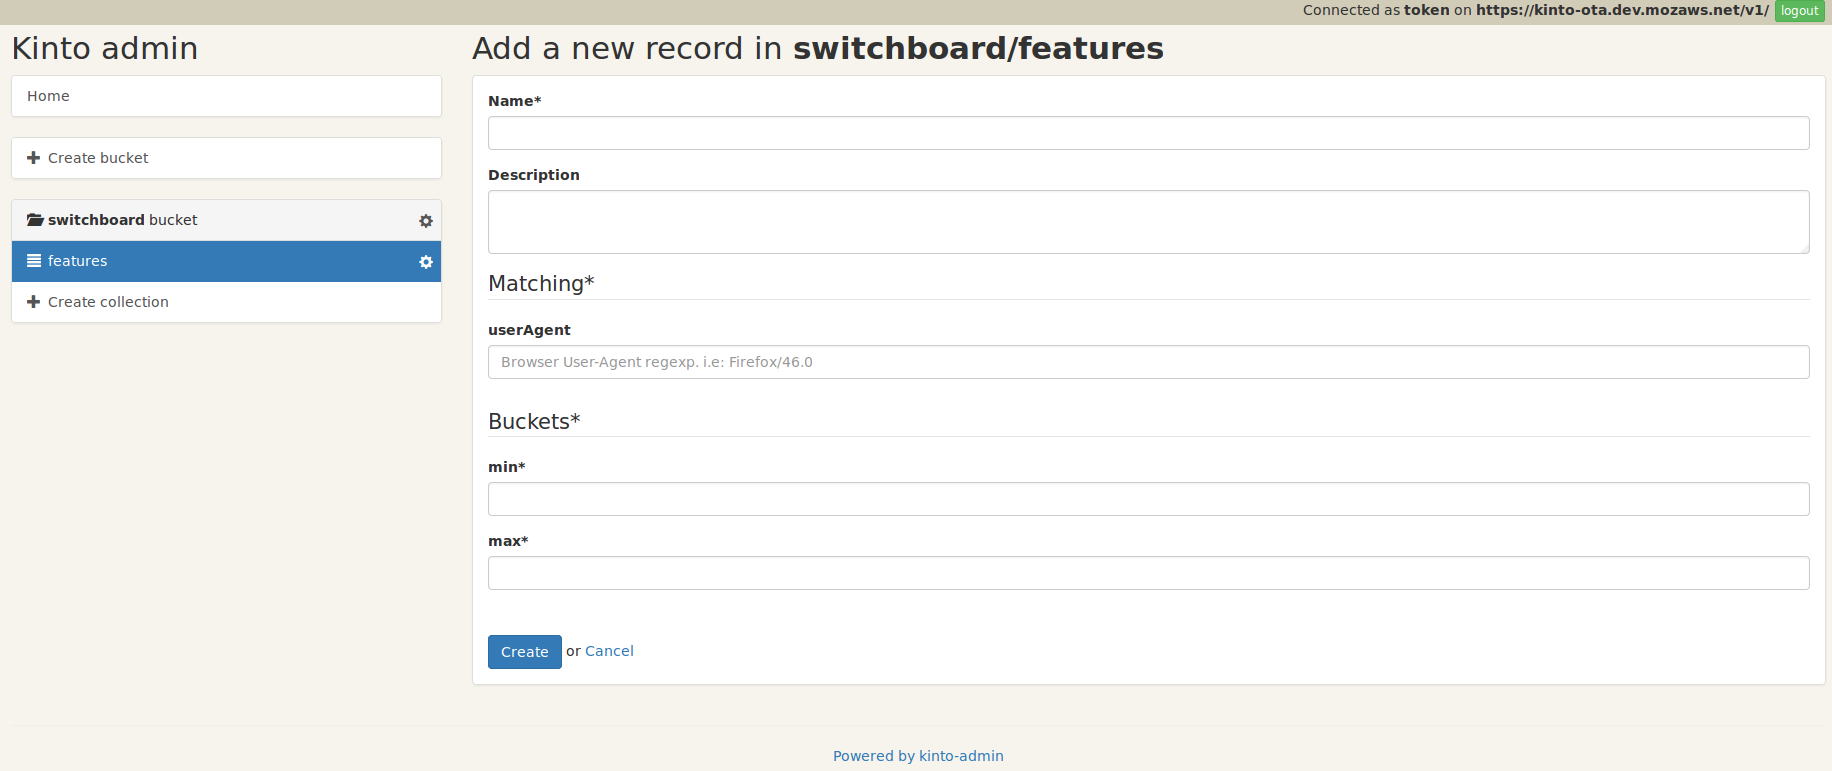
An experiment has got a name and a description as well as some match rules and a buckets range.
For the web, in my proof of concept, matching rules can be defined as regexp on the user languages, country or user-agent.
While defining an experiment we can decide to include a range of buckets using the min and max buckets attributes.
An experiment is then stored in Kinto like this:
{
    "name": "french-banner",
    "description": "Try the new French banner",
    "match": {
        "country": "FR",
        "lang": "fr"
    },
    "buckets": {
        "min": "0",
        "max": "50"
    },
    "values": {
        "url": "https://firefoxos.mozfr.org/dotclear/public/Firefox_OS/.Gerez_votre_vie_privee_intelligemment_Mozilla_m.png"
    }
}
From this experiment description we can extract two crutial pieces of information that we need to track:
- user matches: Is the user matching the experiment?
- user in buckets: Is the user in one of the targeted buckets?
These two information will be used for the metrics part to decide if we should use the new solution rather than the previous one.
If you are currently in France, you can try this experiment.
The good news is that you will be able to change the experiment settings after the release using the kinto-admin.
If you want to start with the feature off for everyone, you can just set the same buckets configuration value for both min and max and it will turn it off.
How to use Kinto to store the experiment metrics?
First with regards to the experiment you want to do, you need a way to trigger metrics.
In the case of the previous example, the metric could be to monitor the number of clicks on the banner when it is written in French or when it is written in English for people in France.
Using the power of Kinto permissions, we can create a collection where people will be able to create new records in it but not change them.
Using HTTPie we can do it like that:
http PUT https://demo.kinto-storage.org/v1/buckets/switchboard --auth admin:switchboard

echo '{"permissions": {"record:create": ["system.Everyone"]}}' | \
    http PUT https://demo.kinto-storage.org/v1/buckets/switchboard/collections/metrics \
        --auth admin:switchboard
Then when people match, we record our metrics:
fetch("https://demo.kinto-storage.org/v1/buckets/switchboard/collections/metrics/records", {
  method: "POST",
  headers: {
      "Content-Type": "application/json"
  },
  body: JSON.stringify({data: {
    name: "french-banner",
    matches: true,
    inBucket: false
  }})
});
You can then count the number of calls with or without the banner:
$ http HEAD 'https://demo.kinto-storage.org/v1/buckets/switchboard/collections/metrics/records?matches=true&inBucket=true' \
    --auth admin:switchboard | grep Total-Records:
Total-Records: 300

$ http HEAD 'https://demo.kinto-storage.org/v1/buckets/switchboard/collections/metrics/records?matches=true&inBucket=false' \
    --auth admin:switchboard --print=h | grep Total-Records:
Total-Records: 20
Conclusion
Because we can calculate the user bucket on client side, we do not have to actually run the bucket repartition algorithm on the server side.
We could even use Kinto to store the number of time the banner have been displayed to make sure of the bucket repartition.
The kinto-admin makes it really easy to handle experiment configuration variables.
Deploy a Kinto now for free on Heroku, Scalingo or your own server and add A/B testing in your website for free.